
10 Methods to Recover Unsaved or Deleted Word Document on Mac
 74.0K
74.0K
 5
5


Accidentally losing your Microsoft Word document on Mac is stressful. Whether Word crashed, you closed without saving, deleted the file, or overwrote important changes, you can still recover your unsaved or deleted Word document.
This guide offers 10 simple ways to recover unsaved Word documents, restore deleted Word files, and recover previous versions of your Word document on Mac. If you want to recover text from a damaged Word document, the steps are also listed.
Best Word Recovery Software for Mac
- Recover unsaved, deleted, damaged Word documents
- Support all versions of Word: 2016, 2019, 2021, 2022, Office 365
- Recover Word documents from Mac, external hard drive, iCloud, etc.
- Recovered Word can be opened and edited without error
- Recover 1000+ file types: video, audio, document, photo, email, bookmark, archive, etc.
- Restore unsaved Excel, PowerPoint, Keynote, Pages, Numbers, WPS, PSD as well
- Repair damaged videos and photos easily
- Additional features: backup disk, create bootable installer, filter and preview files, etc.
 Free Download macOS 10.15 or later
Common Word Document Lost Reasons & Solutions on Mac: Quick Overview
| Word Document Loss Reason | Recommended Solution |
|---|---|
| Unsaved Word document after crash or power failure | AutoRecovery folder or use a data recovery software |
| Accidentally closed Word document without saving | Temporary folder or AutoRecovery |
| Deleted Word document (still in Trash) | Restore from Trash |
| Permanently deleted Word document (emptied Trash) | Time Machine (if enabled) / Data Recovery Software |
| Overwritten Word document (saved changes accidentally) | Version History (if enabled) / Time Machine (if enabled) |
| Lost Word document after macOS update or reinstall | Time Machine (if enabled) / Manual Search |
| Corrupted Word document (won’t open or shows errors) | Open and Repair / Recover Text from Any File |
| Document saved in iCloud but disappeared | Check iCloud Drive / iCloud.com |
| Saved document but cannot find it on Mac | Finder Search / Spotlight Search |
| System crashed and Word file was open | AutoRecovery or Temporary folders |
| Formatted Mac or external drive with Word files | Scan the formatted drive with Cisdem Data Recovery |
How to Recover Unsaved Word Document on Mac?
If Word closed unexpectedly or you accidentally closed it without saving, try these methods to recover unsaved Word documents on your Mac:
Method 1: Recover Unsaved Word Document on Mac with AutoRecovery
AutoRecovery is a built-in Microsoft Word feature that automatically saves a copy of your open Word document at regular intervals (typically every 10 minutes by default).
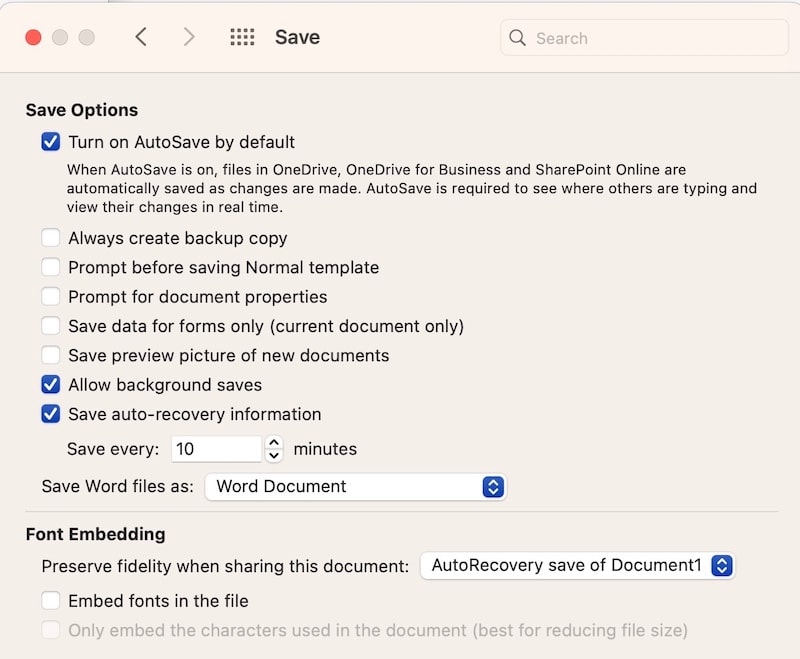
How to Enable AutoRecover on Mac (if not already active)?
- Open Microsoft Word.
- Go to Word > Preferences from the menu bar.
- Click on Save.
- Ensure the box for "Save AutoRecover info every [X] minutes" is checked. If not, check it to enable AutoRecover.
- In the same window, set the interval (e.g., 5 minutes for more frequent saves, default is 10 minutes).
- Click OK to apply the settings.
![auto save]()
How to Recover Unsaved Word Document on Mac with AutoRecovery?
If AutoRecovery was enabled when your document was lost, there's a good chance you can recover it using this method.
Option A: Let Word Automatically Recover Your Unsaved Word Document
- Relaunch Microsoft Word on your Mac.
- If Word detects any AutoRecovery files, it will open a Document Recovery pane on the left side of the window.
- Look through the available documents and click on the one you want to recover.
- Click Save As from the File menu and save the Word document with a new name.
If Word doesn't automatically show recovered files, proceed to Option B.
tips: AutoRecover files (.asd extension) are deleted when you manually save a document or close Word without saving, unless the Keep the last autosaved version if I close without saving option is checked in Preferences > Save.
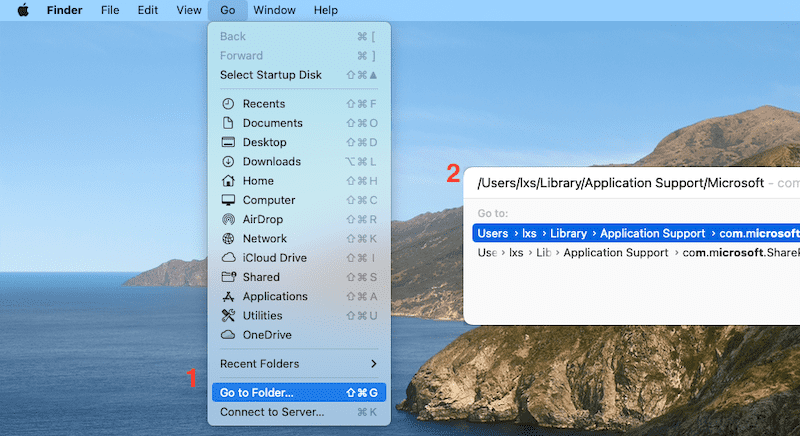
Option B: Manually Recover Unsaved Word Document with AutoRecovery
- Go to Finder on your Mac.
- Click on Go in the menu bar, then hold down the Option (⌥) key and click "Library". (Alternatively, click Go > Go to Folder or press Command (⌘) + Shift + G).
![recover from autosave]()
-
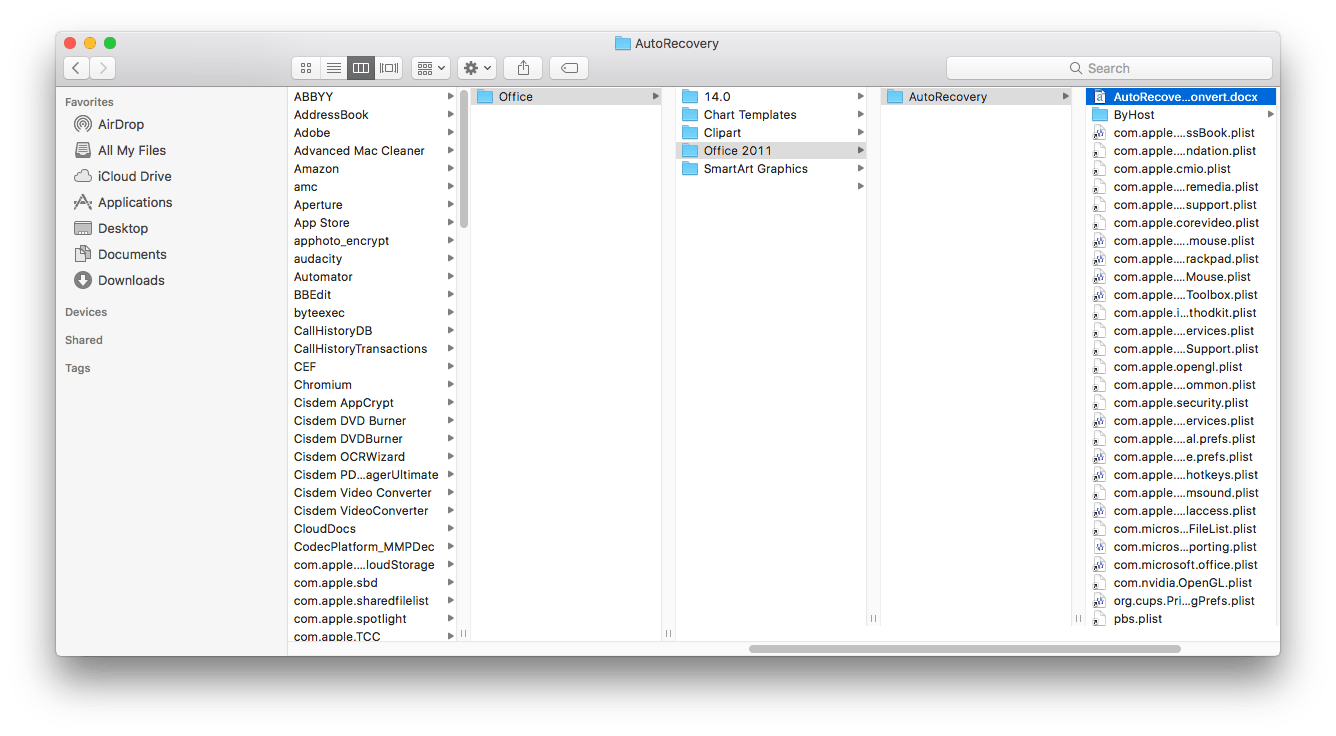
In the "Go to Folder" dialog box, type or paste the appropriate path for your Word version:
Office Word 2016/2019/2021/2024/Office 365: ~/Library/Containers/com.microsoft.Word/Data/Library/Preferences/AutoRecovery/
Office Word 2011: ~/Library/Application Support/Microsoft/Office/Office 2011 AutoRecovery/ - Look for files starting with "AutoRecovery save of" or with a .asd extension. Find the one that matches your lost document (check the date and time).
![autosave location]()
-
Double-click the file. It should open in Word.
-
Immediately go to File > Save As to save the recovered Word document with a new name to a safe location.
If the file doesn't open directly in Word, you can try opening it with TextEdit (some formatting might be lost) or another Word processor.
How to Recover Unsaved Word Document on Mac without AutoRecovery
If you haven’t enabled AutoRecovery or were unsuccessful, you can use these alternative methods to help you recover your Word document on Mac.
Method 2: Use Data Recovery Software to Recover Deleted, Lost, or Unsaved Word Document on Mac
Dedicated data recovery software scans your drive for recoverable data, including unsaved Word files. For best results, we recommend you try Cisdem Data Recovery - the best data recovery software for Mac in 2025.
Cisdem Data Recovery for Mac safely recovers deleted, lost, formatted, and even unsaved Word documents from your Mac's hard drive and other storage devices. It offers several advantages:
- Recovers over 1000 file types.
- Repair corrupted Word, Excel, PowerPoint, video and image files
- Handles various data loss scenarios: deletion, formatting, system crashes, virus attacks, etc.
- Supports all types of internal and external storage devices.
- Allows file preview before recovery.
- Restore files from iCloud.
- Recovers files to a local drive or the cloud.
- High recovery success rate.
How to Recover Deleted, Lost, or Unsaved Word Document on Mac without AutoRecovery?
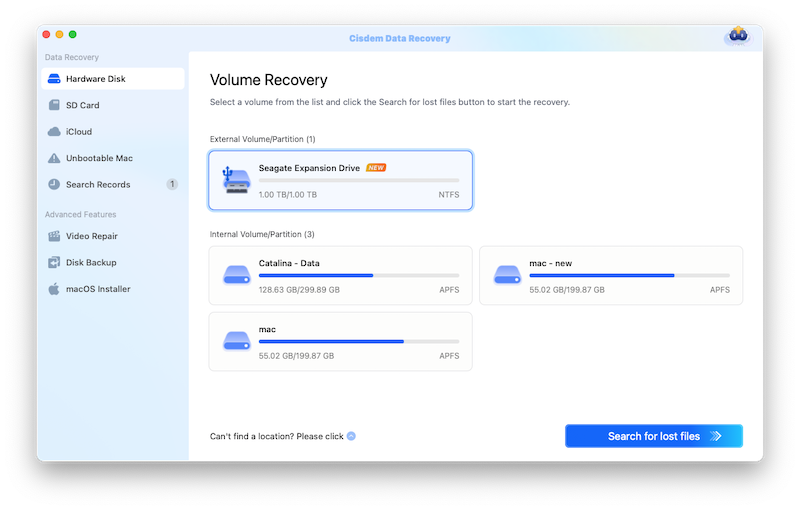
- Download Cisdem Data Recovery software for free below. Install and run it on your Mac.
Free Download macOS 10.15 or later - Go to Hardware Disk, choose the hard drive where your Word document was located. Click Search for lost files to start the scanning process.
![recover word mac cisdem]()
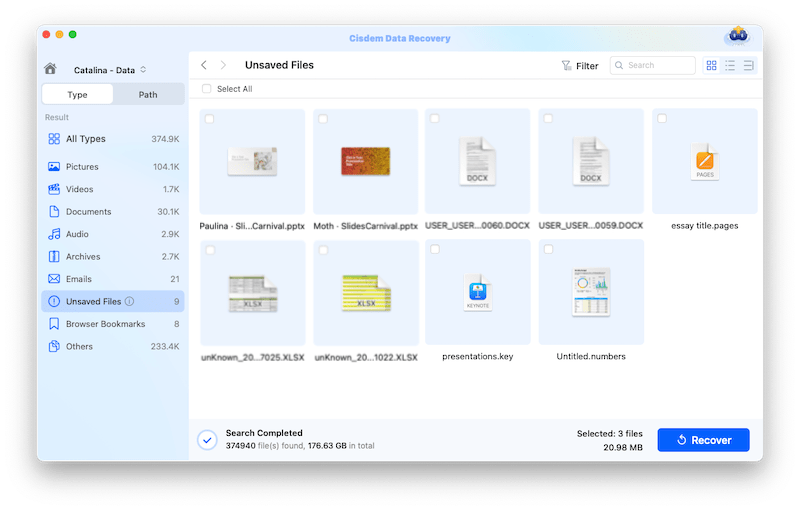
- For unsaved Word documents, go to "Unsaved Files", which displays all unsaved office documents, including Word, Excel, and PowerPoint files.
![recover word cisdem02]()
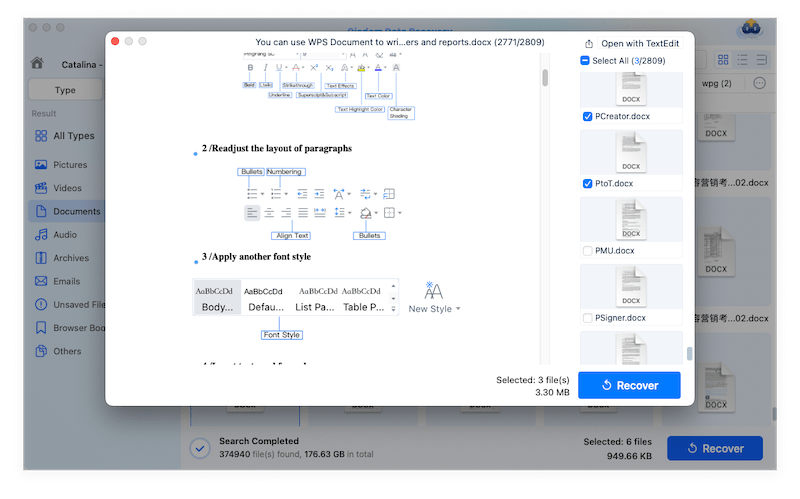
- Alternatively, you can go to Documents > Doc or Docx folder to locate all Word documents (unsaved, deleted, or lost). Use the search box or filters to find your specific document quickly.
![recover word cisdem 02]()
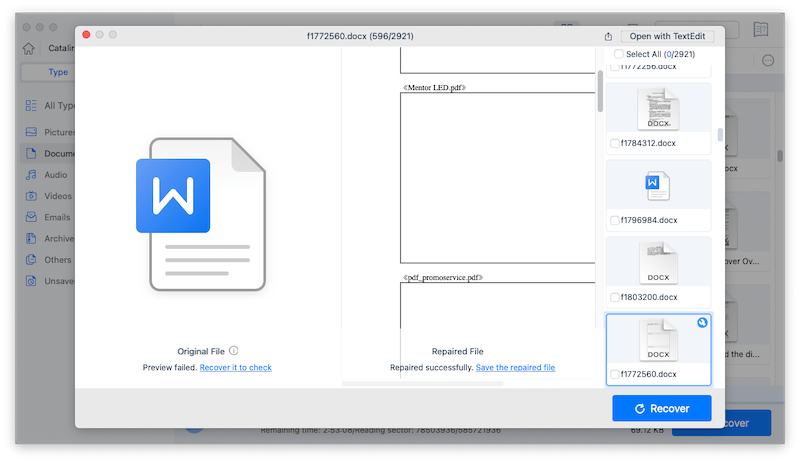
- Double click on the Word file to preview it, or open it with TextEdit. Once confirmed, select the file and click "Recover" to restore it to your chosen location.
![recover word cisdem 04]()

tips: If you cannot preview your Word document, the file might be corrupted. Cisdem will auto-repair your file and allow you to save the repaired document.
Success Story: How Cisdem Saved a Thesis When AutoRecovery Failed
"I had been working on my master's thesis for 6 hours straight when my MacBook suddenly shut down due to battery failure. When I restarted, Word's AutoRecovery couldn't find my document. Cisdem Data Recovery found and restored the entire file in minutes with all my recent changes, even figures and formatting were intact. The entire recovery process took less than 10 minutes." — Sarah T., Graduate Student
Method 3: Recover Lost Word Document from the Mac Temporary Folder
macOS sometimes stores temporary versions of files in a dedicated temporary folder. If AutoRecovery was not enabled or failed to save your document, you can try searching in your Mac's temporary folder for any traces of your document.
How to Recover Lost Word Documents from the Mac Temporary Folder?
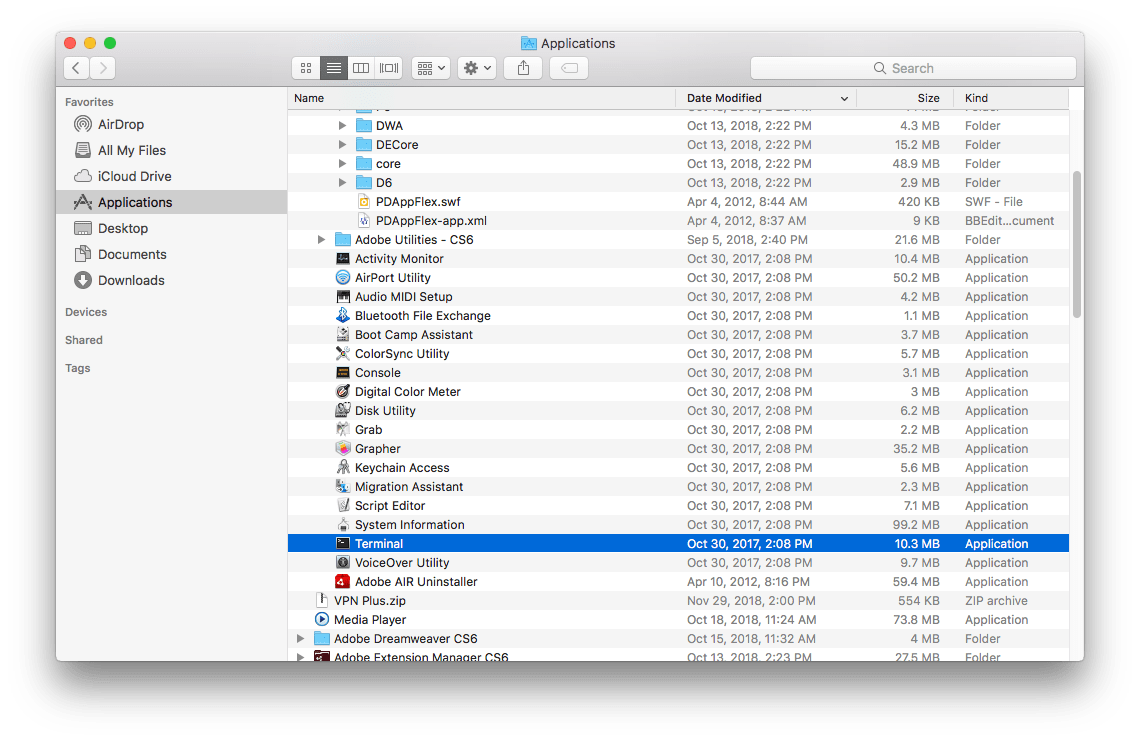
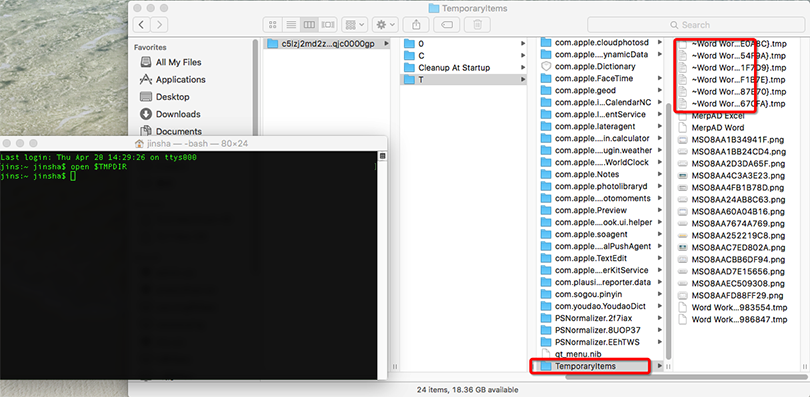
- Open Finder > Applications > Utilities > Terminal.
![open terminal]()
- Type open $TMPDIR and press Enter.
![]()
- Open the Temporaryitems folder.
-
Look for file names containing "Word" or with .tmp extensions.
-
If you find your unsaved Word document, copy it to your desired location and attempt to open it with Word. (try saving with a .doc or .docx extension)
tips: This method is most effective if you do it immediately after Word closes unexpectedly and before restarting your Mac, as temporary files are often cleared on restart.
Method 4: Recover Unsaved Word Document on Mac from Cloud Storage
If you have Microsoft OneDrive set up and enabled for Word, or if you were saving documents to iCloud Drive, there's a chance a version of your file was automatically synced.
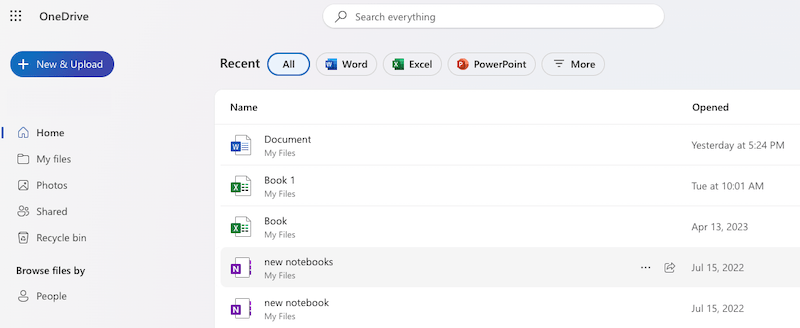
A. Recover Unsaved Word Document on Mac from OneDrive
- Log into your OneDrive account via a web browser (onedrive.live.com) or open the OneDrive folder on your Mac.
- Go to Home or the My files folder.
![recover unsaved word onedrive 01]()
-
Check for a backup of your unsaved Word document.
-
If found, open the document.
-
Go to File > Version History to check for older versions.
![recover unsaved word onedrive 02]()
- Select the desired version and download the file or restore it directly from OneDrive.
B. Recover Unsaved Word Document on Mac from iCloud
- Go to iCloud.com and sign in with your Apple ID.
- Open iCloud Drive.
- Browse your document folders (e.g., the "Word" folder if it exists, or "Documents") for your file.
- If you don't see it, you can also check Account Settings > Restore Files (under the Advanced section at the bottom of the page). iCloud keeps recently deleted files from iCloud Drive for a period, and you might find it there.
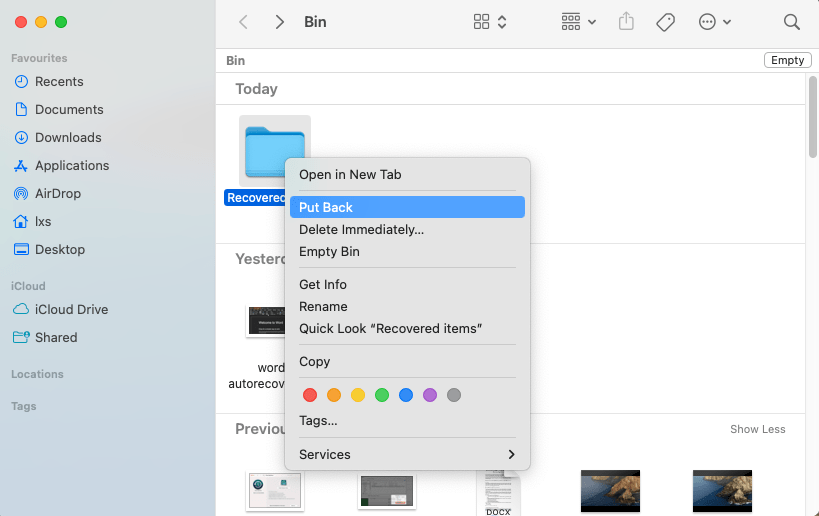
Method 5: Recover Word Document Saved on Mac from Recovered Items Folder
Sometimes, after a system crash or forced restart, macOS places recovered or temporary files it couldn't save properly into a "Recovered Items" folder within the Trash.
-
Open the Trash bin from your Dock.
-
Look for a folder named "Recovered items".
-
Search for your unsaved Word file within this folder.
-
If you find it, right-click on the Word document and select "Put Back" to restore it to its original location.
![recovered items folder]()
How to Recover Previous Version of Word Document on Mac
If you want to recover older versions of a Word document that were previously saved on your Mac, these methods can help you:
Method 6: Restore Previous Versions of Word Document on Mac with Version History
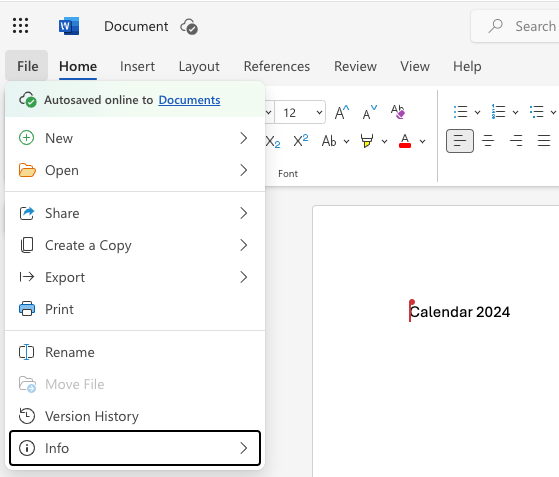
If your document was saved (especially if saved to OneDrive or SharePoint), Word itself might keep a history of versions.
For Office 2016 & 2019 & 2021 & 2024 (and newer versions connected to cloud services)
-
Open the Word document.
-
Go to File > Browse Version History (or it might be under File > Info > Version History).
![browse version history word]()
-
A pane will open showing available versions with timestamps.
-
Select a version to preview it.
-
Click Open Version or Restore to revert to that version. You can then save it as a new copy.

For Office 365 (if files are in OneDrive/SharePoint)
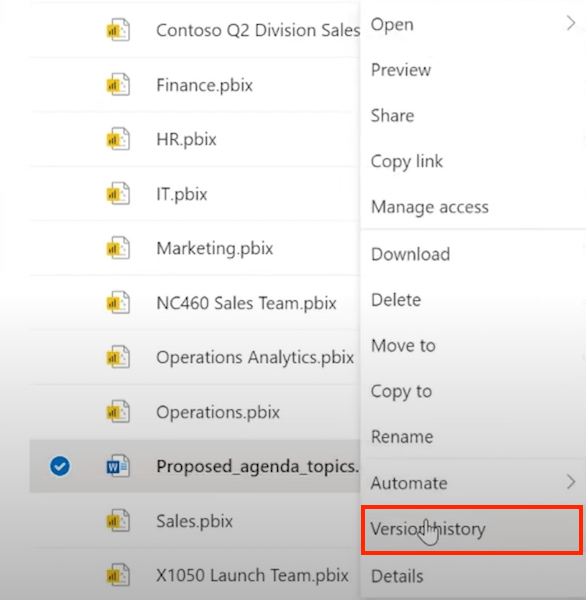
- In OneDrive or SharePoint online, locate the file.
- Right-click the Word document (or click the three dots ...) and select Version history.
![browse version history 365 01]()
-
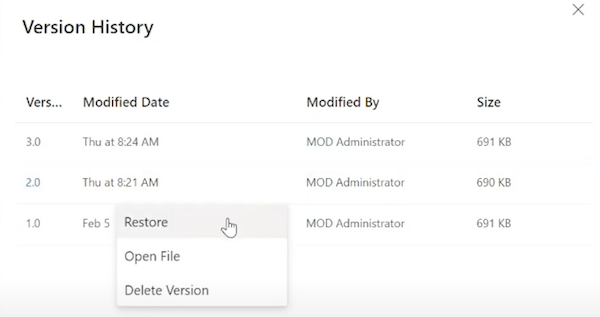
Select the desired version from the list.
-
Click the three dots next to that version and choose Restore (to replace the current version) or Open file (to open that version).
![browse version history 365 02]()
Method 7: Restore Previous Versions of Word Document on Mac with Time Machine
Time Machine is a built-in macOS backup feature. If you have it set up with an external backup drive, you can recover older versions of your Word, Powerpoint, and Excel documents, videos, images, or any other files.
How To Recover Previous Version Of Word Document Mac Using Time Machine
-
Connect the external drive containing your Time Machine backups (if it's not already connected).
-
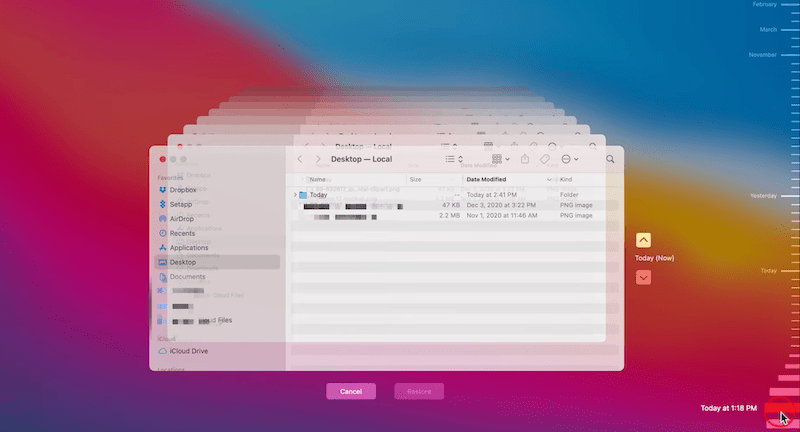
Open the folder where your Word document was stored. Or you can go to Finder > Documents, then find the Word file manually.
![recover previous word time machine 01]()
-
Launch Time Machine. You can do this by clicking the Time Machine icon in the menu bar and selecting "Enter Time Machine," or via System Settings > General > Time Machine.
-
Use the timeline on the right edge of the screen or the up/down arrows to navigate back in time to a point before the Word document was changed or lost.
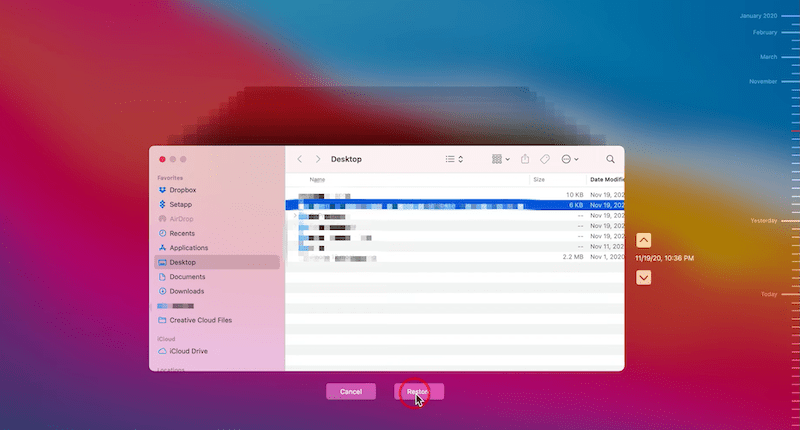
-
Locate the desired version and press the spacebar to preview it.
-
Select the file and click Restore. Time Machine will restore it to its original location (or ask you where to save it if the original is still there).
![restore previous word time machine 02]()
Method 8: Manually Find the Previous Version of Word Document Mac
If you didn't create the Word document: Contact the original sender or creator and request a previous version.
If you created the Word document:
- Check your email: Search your sent emails for attachments containing older versions.
- Check cloud storage: Look for version history or earlier saves in services like iCloud, Google Drive, or Dropbox.
- Check the Trash Bin: If you deleted an older version, it might still be in the Trash.
- Search for local saves: Look through your computer's folders for manually saved copies or duplicates.
How to Recover Deleted Word Document on Mac?
If you saved your Word document but then accidentally deleted it, these methods can help you recover it.
Method 9: Recovering Deleted (Not Unsaved) Word Documents from Trash in Mac
When you delete a file on a Mac, it usually goes to the Trash first, unless you've specifically bypassed it (e.g., with Option + Command + Delete) or emptied the Trash.
Steps to recover deleted files from trash in Mac:
- Open the Trash from your Dock.
- Locate your deleted Word file. You can sort by Date Added or search within the Trash.
- Right-click (or Control-click) on the file and select Put Back.
- The file will be restored to its original folder.
Files typically stay in the Trash for 30 days or until you manually empty it. If the Trash has been emptied, you'll need to rely on Time Machine backups (Method 5) or Data Recovery Software (Method 2).
How to Recover Text from a Damaged Word File on Mac?
If your Word document is damaged or corrupted and won't open correctly, you can try extracting the text to salvage your work.
Method 10: Use Microsoft Word's "Recover Text"
Microsoft Word has a built-in repair feature that can sometimes fix corrupted documents.
- Open Microsoft Word.
- Go to File > Open.
- In the Open dialog box, select the corrupted Word document.
- Click the dropdown arrow next to the "Open" button.
- Select Recover Text.
![recover text]()
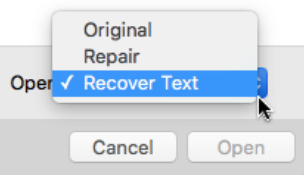
Word will attempt to recover text from the damaged Word document.
Tips to Avoid Losing Word Documents on Mac
Prevention is always better than recovery. Here are some best practices to help you avoid losing your Word documents on Mac in the first place:
- Enable AutoSave and AutoRecover: Ensure AutoSave is turned on for Microsoft 365 subscribers. For all Word versions, keep AutoRecover enabled (Word > Preferences > Save > Save AutoRecover info every X minutes) and set to save every 5-10 minutes.
- Save Frequently: Make it a habit to press Command (⌘) + S every few minutes, especially after making any major changes. Don't rely solely on auto-save features.
- Use Cloud Storage: Save important Word documents to cloud services like OneDrive, iCloud Drive, Google Drive, or Dropbox which offer version history and automatic syncing.
- Set Up Time Machine: Set up Time Machine with an external drive to create regular backups of your entire Mac, including your Word documents. This helps in recovering older versions or deleted files easily.
- Save Multiple Versions: For very important projects (like a thesis or a long report), save different versions of your Word documents with version numbers (e.g., Report_v1.docx, Report_v2_draft.docx).
- Use a Surge Protector: Invest in a good surge protector to protect your Mac from unexpected power outages or surges that could cause it to shut down suddenly.
- Use Antivirus Software: Run regular antivirus scans to keep your Mac protected from malware that can corrupt or delete your files.
FAQs about Word Document Recovery on Mac
1. How to find an unsaved Word document on a Mac if AutoRecovery doesn't prompt?
To recover an unsaved Word document on Mac when AutoRecovery doesn’t prompt, open Spotlight (⌘ + Space) or press ⌘ + F in Finder, type a your file name or “.doc”/“.docx,” then sort results by Date Modified to locate your file quickly. If that doesn’t work, press ⇧ + ⌘ + G in Finder, enter /private/var/folders/, select the TemporaryItems subfolder, and open any recent Word files you find with Word.
2. Can we recover an unsaved Word document on Mac via Terminal?
Terminal doesn't directly recover unsaved Word files in the way AutoRecovery does. It can be used to navigate to temporary folders where AutoRecovery files might exist, but using Finder is usually easier.
However, Terminal can recover Word documents you've moved to the Trash (unless delete permanently):
- Run Terminal (Applications > Utilities).
- Type cd ~/.Trash and press Enter.
- Type ls to see files in Trash. Find your document name.
- Type mv YourFileName.docx ~/Documents/ and press Enter. (Replace "Your Filename.docx" with the exact file name, using quotes if it has spaces. ../ moves it to your Home folder. For example: mv Unsaved\ Word\ recovery\ mac.docx ../).
- Check your Home folder for the recovered document.
3. How to open recovered files in Word on Mac?
Double-click the recovered file to open it in Microsoft Word. If it's an AutoRecovery file, Word should handle it. If Word won't open it, try opening it with TextEdit to retrieve plain text (formatting will likely be lost). If TextEdit fails, try other Word processors like Pages or LibreOffice. If the file still won't open or is empty, it may be corrupted. Try using Cisdem or online repair services.
4. How to recover a recently deleted (but previously saved) Word document on Mac?
The first place to check is the Trash (Method 9) to recover a deleted Word document. If it's not there, use Time Machine (Method 7) if you have backups. If neither works, Data Recovery Software (Method 2) is your best bet.
5. Where is Manage Document in Word on Mac?
The 'Manage Document' feature found in Word for Windows (under File > Info > Manage Document, for recovering unsaved drafts) does not exist in Word for Mac. Mac Word relies on the AutoRecovery feature that prompts upon relaunch after a crash, or manual folder check for handling unsaved file recovery. While core functions are similar, interface specifics like this differ between platforms.
6. How to recover a permanently deleted Word document on Mac?
To recover Word documents deleted permanently (e.g., after emptying the Trash), start by checking your backups. If you use Time Machine:
- Connect your backup drive.
- Enter Time Machine.
- Navigate to a time before the deletion.
- Select the file.
- Click Restore.
Also, check the web version of your cloud storage (OneDrive, iCloud Drive, Dropbox, etc.). Look in the main folders and the service's own Recycle Bin or Trash folder for the deleted file, and then restore or download it.
If you have no backups, use data recovery software to scan your drive for file remnants. Cisdem Data Recovery can help recover permanently deleted Word documents, even without backups.
Conclusion
We’ve already put together a comprehensive guide here for you to recover a Word document on Mac, which contains multiple helpful options under different situations. While AutoRecovery can help with unsaved documents, it's not always reliable. For a more robust and long-term data recovery solution, consider Cisdem Data Recovery, which is well worth paying to rescue your files when data loss happens.

Connie Yu has been a columnist in the field of data recovery since 2011. She studied a lot of data loss situations and tested repeatedly to find a feasible solution tailored for each case. And her solutions are always updated to fix problems from the newest systems, devices and apps.

JK Tam is the lead developer at Cisdem, bringing over two decades of hands-on experience in cross-platform software development to the editorial team. He is now the lead technical approver for all articles related to Data Recovery and DVD Burner.
Lynne
nothing in the autosave location. could you please help me recover an unsaved file remotely? i can pay.
Shirley C. Dominguez
Finally come across a tool recovering unsaved document directly. At the end, autosave didn't work, we still need a 3rd-party software to rescue the data.
Ashlin Brown
AutoRecover didn't work. Still I have no backups. Any other possible solutions to recover my deleted word document without the need of third-party tool? Please help.
Nick Bruce
So far, the fullest guide to recover a word document, I managed to recover the docx file in my icloud backup. Thanks.
Shawn Thomas
Awesome. This really helped me and I appreciate your work. Happy New Year 2018!